
Uv Water Filter Installation
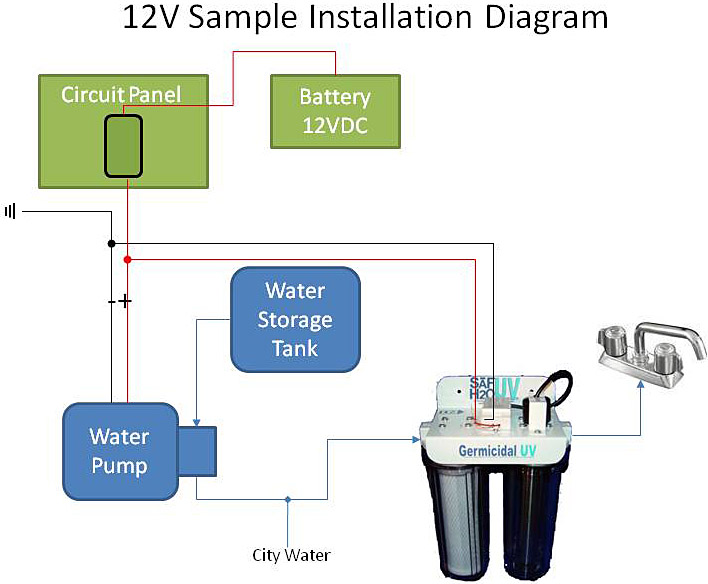
INSTALLATION INSTRUCTIONS Complete installation instructions and diagrams are included with each unit. The instructions below are intended to show the ease with which a system installs and for users who do not have access to their included instructions.
You will need the following materials:
- An available 12v-dc lead or 120v outlet connection
- Pipe wrench or crescent wrench to install the fittings
- Wire connectors for the 12v connection to your power source
- For 120v systems the unit comes with a standard plug with ground
- Teflon tape and/or paste for those fittings
- Two 1/2 male pipe thread fittings adapters to connect your pipes to your new water filter system.
Step 1. Turn off the Power. Turning off the power to your water pump, 12v, and to your point of 12v connection will keep you from getting shocked during installation. On 120v just leave the unit unplugged
Step 2. Choose the location of the Filter System. The unit should be installed after your water tank and as close to the point of use as possible. You can filter the water before it enters your boat or rv tanks, but you need to make sure that your tanks are kept clean from bacteria that might already be in your water system. A regular chlorine shock can help keep your tank clean. Having the filter system placed as close as you can to points of use is the best practice.
Step 3. Check the direction of water flow. The incoming water should be routed to the water filter system entering into the plastic filter housings first, and exiting through the UV chamber last.
Step 4. Drain and de-pressurize your water line. Open a faucet to drain the remaining water before interrupting the water line.
Step 5. Mount your system. Mount your water filter system upright in desired location in your boat or rv. Make sure you have access the UV Lamp and filters to change them when necessary. Generally the filter systems need to be mounted upright as any other direction will make changing the water filter cartridges very hard to do.
* Due to the fact that the ultraviolet bulb will need to be replaced after 7000-9,000 hours of use, we STRONGLY urge you to install your 12v water system in a place that allows enough clearance on the top of the filter system to remove and replace the uv lamp on Water Safe Pro units.
Step 6. Installing the water lines. Install the 1/2 male fitting into the in and out ports on the filter system. 2 wraps of Teflon tape and a little bit of Teflon paste on each will make the seal water tight. Do Not over tighten the fittings or you will crack the plastic filter housings. Installing Shut-off Valves. Some customers will want to leave the rest of their house, rv or boat water system on when changing filters. To do this you will need to install a shutoff valve on each side of the your water filter system. After installing the fittings connect your water lines to the system.
Step 7. For DC Power - Check your 12v power source and wires. The Proper Voltage is 12v-13.5v measured at the point of connection. Over 14v or under 11v will shorten the life of the ballast dramatically.
Step 8. For DC Power - Connecting the 12v power source. Connect the leads from the 12v ballast on your system to 12v power source. Make sure that the wire from the source is the correct size to carry 12v to the system. Make sure the connections are tight. If using Solder be sure to use 60/40 electronics solder to connect the wires. Many customers connect their water filter systems to the same circuit that their water pump is on in their boat or rv. In this way you can be sure that your 12v UV system is on and treating when you turn your pump on and pressurize your system.
Step 9. Turn on the power to your system. 12v DC - turn your power on. 120v AC just plug the ballast into the wall recepticle. This may seem backwards as you want to check for leaks first, right? Yes and no. If you have done your installation job well your risk of leaks is very low. By turning the power on to your system you before turning the water on you will make sure any water that runs through the system will be treated. Verify that the system is on by looking for the blue light from the bottom end of the UV chamber.
Step 10. Turn the water on and check for leaks. Verify the your system and all the fittings are holding water with no leaks. Flushing water through will clear air and carbon fines from new filters. Now enjoy your filtered water!